
When you need to pass a stove or chimney flue through a roof, the first issue is not the flue itself, but the framework. Creating an opening in a load-bearing structure without weakening it requires a properly sized header. This wooden frame distributes the loads from the cut rafters or joists to the remaining load-bearing elements while maintaining the safety distances imposed by the DTU 24.1.
Framework Diagnosis Before Any Cutting for a Flue
On-site, it is observed that most errors occur even before the first cut is made. The classic reflex is to locate the flue position from the inside and then attack the framework. It is exactly the opposite that should be done.
The first step is to check the condition of the rafters and purlins around the planned area. Wood weakened by moisture or attacked by insects will not support the load transfer of a header. If the existing structure shows weaknesses, the affected elements must be reinforced or replaced before opening anything.
One must also identify any deviations of the existing flue, as they directly affect the position and size of the roof opening. A flue that is not perfectly vertical requires a shift of the header relative to the stove axis, which changes the entire sizing.
Before marking, it is useful to create a roof header following a method that incorporates the position of the roof outlet from the start. Because the overhang rule above the ridge and nearby obstacles directly guides the location of the header, not the other way around.
Safety Distance and DTU 24.1: What Really Sizes the Header
DTU 24.1 imposes a fire safety distance between the flue and any combustible material. This distance varies according to the type of flue (single wall, double wall insulated, clay flue liners) and the temperature class of the system. A single figure cannot be fixed, as each flue manufacturer specifies the minimum distance in their technical notice.
In practice, it is this safety distance that determines the internal dimensions of the header, not the other way around. The header is not a frame adjusted to the flue: it is a frame adjusted to the regulatory distance around the flue.
What the Safety Distance Implies for Assembly
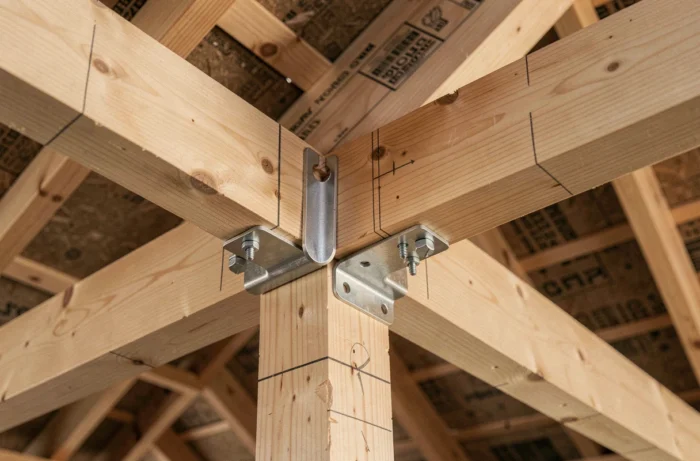
The cut rafters (known as header rafters) must be connected to the transverse pieces of the header, which are themselves fixed to the remaining load-bearing rafters. Each element of the header must remain beyond the safety distance, including metal brackets or connectors.
The space between the flue and the wood of the header is generally filled with a non-combustible material. Rock wool is the most common choice on construction sites. It provides both thermal insulation and some flexibility to absorb the flue’s expansions, a point often overlooked but mentioned in installers’ field feedback.
Assembly of the Roof Header: Wood Sections and Fixings
The choice of the section of the wooden pieces depends on the span between the load-bearing rafters and the roof load. Structural timber of the same section as the existing rafters is generally used, sometimes reinforced if the opening is wide.
- The load-bearing rafters frame the opening. If they are too far apart compared to the standard spacing of the framework, the rafter on each side is doubled to compensate for the load.
- The top and bottom cross members (the horizontal pieces of the header) connect the load-bearing rafters. They are assembled with metal brackets or through bolts, never with simple screws.
- The header rafters, cut to create the opening, are connected to the cross members with connectors suitable for their section. A header rafter that floats without rigid fixation creates a weak point in the roofing.
Feedback varies on the use of brackets versus through bolts: brackets are quicker to install, while bolts offer better shear resistance on large spans. The context of each framework settles the debate.
Assembly Order on Site
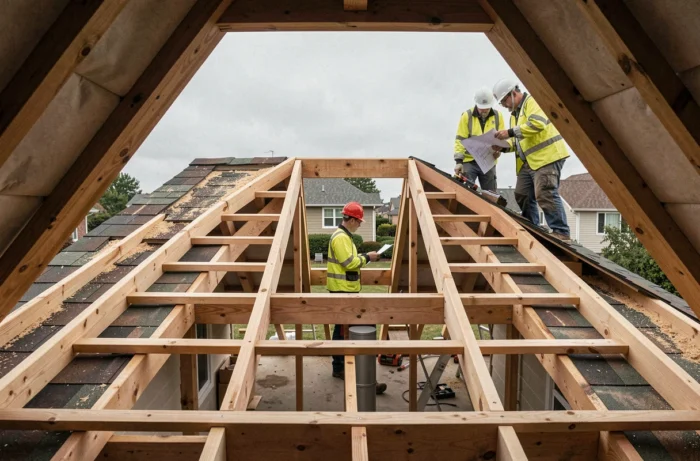
Start by shoring up the area so that the rafters to be cut do not sag during the intervention. Then, cut the header rafters to the desired length, fix the cross members to the load-bearing rafters, and then connect the header rafters to the cross members. Only after checking the plumb and the solidity of the whole should the flue be passed through.
Sealing at the Roof Penetration: Treating the Header from the Outside
A structurally perfect header but poorly sealed will cause leaks within months. Sealing should be addressed at the same time as the header, not afterward. Recent content emphasizes this point: the roof penetration must be considered as a whole flue-header-sealing system, not as three separate interventions.
The flashing piece (base or sealing collar) is installed on the roof around the flue, with sufficient overlap on the surrounding tiles or slates. It must rise under the covering elements above and cover those below, to follow the direction of water flow.
The connection between the flashing and the flue is ensured by a flexible seal or a collar suitable for the diameter of the flue. A continuous flue from the bottom to the roof outlet reduces the risk of condensation and simplifies the treatment of the penetration.
The flue’s stack must extend sufficiently above the ridge and nearby obstacles to comply with draft and safety rules. This outlet height, often underestimated in advance, may require repositioning the header if the margin was not taken into account during design.
A well-designed header anticipates the entire chain: structure, safety distance, sealing, outlet height. Treating these points separately exposes one to costly rework. The diagnosis of the existing structure and careful reading of the flue’s technical notice remain the two prerequisites that nothing can replace.